The Tile Block Normal/XOR dialog is one of the six CDG instruction editing dialogs. The other five dialogs are:
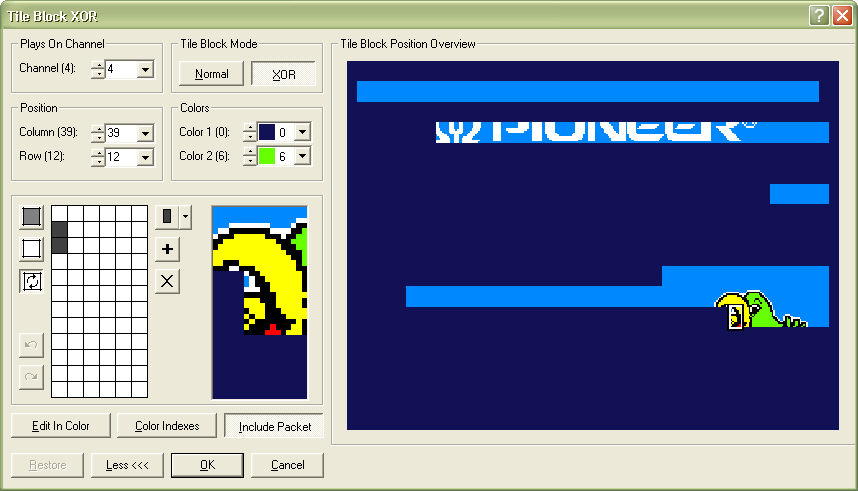
The Tile Block dialog has the following basic layout:

By clicking the More button you will get an full view of the entire CDG canvas:
A click on the Less button reverts to the basic layout. The full CDG canvas updates live to reflect any change done to the Tile Block instruction.
The Plays On Channel block is used to select in which channel the instruction plays:
The Tile Block Mode block toggles the instruction between Normal and XOR mode:
The Position block is used to position the tile on the CDG canvas by selecting row and column:

The position of the tile can also be changed by pointing at the tile in the extended view of the CDG canvas and dragging it to a new location while holding the left mouse button down.
The Colors block defines the two colors - foreground and background - used to draw the tile:

The main part of the dialog is the drawing and preview block:

The leftmost rectangle is the drawing area. The 6 by 12 grid resembles the tile bitmap, where the dark cells are set and the white cells are cleared bits. The cleared bits are drawn with Color 1 and the set bits with Color 2. The rightmost rectangle is a 3 by 3 tiles preview with the current tile in the middle. The preview is updated live as the tile definition changes.
The bits in the tile are by default toggled on and off by clicking them. Holding down the left mouse button and "dragging" across the drawing bitmap will toggle all bits that are touched. The top three buttons to the left of the drawing bitmap are used to select how bits are modified when clicked:
![]()
The top button when selected makes all clicked bits set.
Selecting the middle button makes all clicked bits cleared.
Finally, the lower button, which is selected by default, makes all clicked bits toggle between set and cleared for each click.
The lower to buttons to the left of the drawing bitmap provides undo and redo functionality for operations in the drawing bitmap:
![]()
The buttons to the right of the drawing bitmap are used for predefined tile patterns:
![]()
The upper button is actually a drop-down list with predefined patterns. Selecting one of these patterns will set all the bits in the tile according to the selected pattern.
The middle button will take the current tile definition and add to the list of predefined patterns.
The bottom button removes the currently selected drop-down list pattern.
Below the drawing area are three buttons to select how to display and preview the tile:
Edit In Color changes the drawing bitmap from black and white to color, giving you a detailed view of the tile:

For a Tile Block Normal instruction the color drawing bitmap will only show the two selected drawing colors. For a Tile Block XOR instruction on the other hand, the color view can be really useful because the resulting colors depend on the previous contents of the tile as much as the selected two drawing colors.
The Color Indexes button is somewhat related to the Edit In Color function, but it shows the color indexes instead of the actual colors:
Also as for the Edit In Color function the usefulness primarily relates to the Tile Block XOR instruction. The Edit In Color and Color Indexes functions may of course be used together:

Finally, the Include Packet button, that is used to select if the edited instruction is included in the preview or not. This can sometimes be of great help to determine how a Tile Block XOR instruction affects the existing tile bits:
The Include Packet function also affects the colors and/or indexes in the drawing bitmap if selected:


The Restore button at the bottom left of the dialog is used if you want to restore the tile to the state it had when the dialog was opened, discarding any edits. It has the same effect as closing the dialog with the Cancel button and then reopening the same tile.
For more information about this and other CDG instructions and their usage please refer to The CDG graphics format.